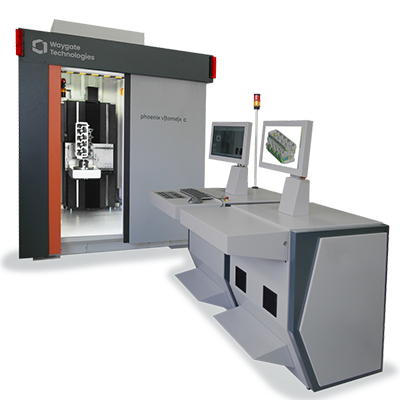
Phoenix V | tome | x C450Achieving safe, profitable production via high-throughput 3D Metrology Scanning
Our Phoenix V|tome|x C450 3D CT scanning solution offers a compact 450 kV CT system specially designed for non-destructive testing (NDT) and quality assurance labs in foundries or aerospace applications with the flexibility that allows for combined semi-automated non-destructive testing and 3D metrology. The low maintenance and production-oriented design features like easy loading tools, barcode reader, etc., as well as the new one-button|CT automation functionality make the Phoenix V|tome|x C a very efficient tool for high-throughput industrial quality assurance where the highest levels of safety, uncompromising quality, and increased productivity are needed. The Phoenix V|tome|x C is the first industrial minifocus CT scanner with Waygate Technologies proprietary breakthrough scatter|correct technology option allowing users to gain a low scatter artifact CT quality level never before reached with conventional industrial flat-panel cone-beam CT. Waygate Technologies' new scatter|correct technology automatically removes most scatter artifacts from the CT volume. This technological advancement provides image quality similar to that achieved with conventional fan-beam scanning but at speeds up to 100 times faster. The quick|pick manipulator of the high-speed configuration HS even allows fully automated CT evaluation of large batches, e.g. to scan up to 25 turbine blades without any operator action within approx. 2 hrs. The system offers industry-leading sample size, flexibility, and maximum penetration power for high absorbing samples at 450 kV. CT Scanning Metrology for non-destructive testing and high throughput quality assurance:
|
Industry-Leading Detector Performance
The Phoenix V|tome|x C comes standard with our exclusive 4 MP dynamic 41|200 next-generation photodiode design industrial X-ray detector, It provides 10x increased sensitivity relative to the state of the art 200µm pixel size DXR detectors producing 2-3x cycle time increase without image quality impact, making inspections and measurements more efficient and productive.
As a premium option, the 100µm / 16 MP dynamic 41|100 detector provides a 2x resolution increase without cycle time impact. Detection of 2x smaller defects without an increase of geometric magnification allows for the imaging of large objects at a higher resolution.
As a premium option, the 100µm / 16 MP dynamic 41|100 detector provides a 2x resolution increase without cycle time impact. Detection of 2x smaller defects without an increase of geometric magnification allows for the imaging of large objects at a higher resolution.
Precision Metrology, Flexible Operations
CT scanning provides precise 3D coordinate information of visible and non-visible surfaces. The Phoenix V|tome|x C delivers a measuring precision of 20+L/100 µm relative to the VDI 2630 guideline.
The Phoenix V|tome|x C can inspect different parts from multiple production lines for statistical production process control in one pass and completed as quickly as possible.
The Phoenix V|tome|x C can inspect different parts from multiple production lines for statistical production process control in one pass and completed as quickly as possible.
High Throughput, Automated CT Process
Advanced scatter|correct technology enables scanning up to 100 times faster compared to similar precise state of the art fan-beam CT, without compromising image quality—even for high-scattering materials or composite samples. The dynamic 41 digital detector can double scan speed or resolution.
With one-button|CT functionality, the entire CT scanning process can be fully automated, minimizing operator time. In the high-speed (HS) configuration, the quick|pick manipulator allows for fully automated blade inspection.
The Phoenix V|tome|x C boasts a robust, small footprint for production control with a low cost of ownership.
REPRODUCIBLE 3d Metrology
Besides inspection, CT scanning also provides precise 3D coordinate information even of hidden surfaces. The Phoenix V|tome|x C delivers a measuring precision of 20+L/100 µm referring to VDI 2630 guideline.
Optimized Production Process
Get industrial-strength CT performance specified referring to ASTM E 1695 guideline without the high cost of maintenance and operator time, while increasing sample size, flexibility, and penetration power for high-absorbing samples.
Specifications
- Max. 3D scanning area is 500 mm Ø x 1000 mm
- Max. sample weight is 50 kg / 110 lbs
- Max. detail detectability is ≥ 100 µm
- 3D measurement accuracy of 20+L/100 µm referring to VDI 2630 guideline
- CT performance specified referring to ASTM E 1695 guideline
- Dynamic 41|200 detector for 2-3x increased CT inspection speed


